
My FT990 was built around 1991 and built like a battleship. I’m sure its ATU would “tune” up a 12-inch spanner if required! It still works very well and I’ve only had to replace a voltage regulator and the backup battery in 15 years.
I’d never tried the CAT interface or digimodes and thought I would try out FT8 etc. My FT990 has the original ROM v1.2 which has a different CAT protocol to the later ROM v1.3 and I found none of the available rig control software would talk to it properly.
After complaints to Yaesu that the interface was too slow to use for contesting, Yaesu brought out ROM v1.3 in 1992/3 which dramatically improved the CAT interface and most CAT software already supports v1.3.
CAT can be made to work for v1.2 but you have to accept some limitations as the CAT interface has to work differently to the v1.3 ROM.
Contents
What version of CAT does your FT-990 have
What you need to run CAT/FT8 software
What are the differences between ROM v1.2 and v1.3
RF Output and Audio input to the rig
My experience with WSJT-X with ROM v1.2
For Software developers: how to rebuild Hamlib to match future releases
What version of CAT does your FT-990 have?
The rig will display the ROM version by running the “Las Vegas” diagnostic test of the display and its microprocessor. The way to do this is to start with the rig powered off. Then:-
Press and hold the 1.5 and 7 MHz band buttons whilst switching power on.
After a few seconds it will display “Yaesu” followed by its ROM version.
What you need to run CAT/FT8 software with the FT-990
I’ve been using WSJT-X software which is available on Windows XP upwards and other platforms such as Linux and OS-X. My descriptions below are using Windows 10.
If you plan to run FT8 then you will need a moderately quick but not super fast PC (they recommend having a CPU clock speed of 1.5GHz or faster). FT8 uses 15 second transmission slots synchronised with UTC so speed and keeping your PC time to the second are vital.
Sync your PC Clock every day!
Even if you have a fast PC you must regularly re-sync your PC clock with a time server otherwise you will see the waterfall but none or very few decodes! To do this manually you click on the date/time on the taskbar and in the advanced settings there is usually an option to do a sync. There is an app you can install which will do this automatically which you can download from https:thinkman.com/dimension4/
CAT cable details
Yaesu CAT for the FT-990 uses a standard 6-pin DIN plug at the rig end and expects an old RS-232 serial interface at the PC end. Most modern PCs don’t have one of those so you will probably need a USB (universal serial bus) connector with an in-built serial conversion chip in it. Your CAT cable will need a driver installed on the PC for it to work.
The CAT interface 6-pin DIN socket on the back.

It is possible to build your own cable with a chip but I chose to buy one ready made from Steve at XGGComms. I have since bought another one from Steve for my FT747GX and both these cables worked first time. Visit http://xggcomms.com/index.html and navigate to “Yaesu Interface Shop”. You should find on that page “FT-CAT-USB” which is the CAT cable on its own – you want Option 3 for the FT-990. Steve’s cables come with detailed instructions too!
Notes:
- Avoid any option on the page with both the CAT and audio cables using the PACKET DIN socket as that doesn’t work to transmit FT8
- The FTDI chips are thought a more reliable solution than SiLabs chips. I have tried using a cable with a SiLabs chip and another FTDI cable which didn’t work for me. The XGGComms cable worked first time for me so I recommend that one – see below!
- There is a solid recommendation to put a 1200 ohm resistor across pins 1 and 2 (ie. ground to serial out) to get a CAT cable to work. Some early FT-990s have an open emitter at their serial output (pin 2). If the PC interface doesn’t provide enough loading to bring the serial output voltage down to below 0.5v this is a problem.
Installing the FTDI Driver
Visit https://ftdichip.com/drivers/ and install the drivers for your PC operating system.
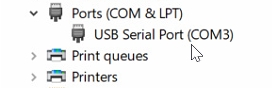
Once installed you will see in Windows Device Manager something like this below. Make a note of which COM port has been assigned (eg. COM3) as you will need this when you configure your CAT program:-
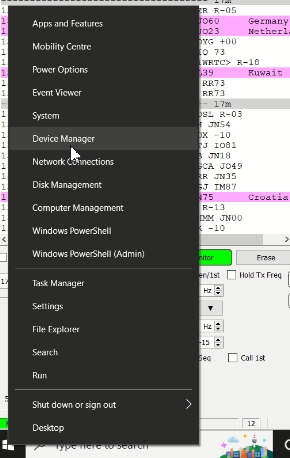
Note: you find Windows Device Manager by right clicking on the Start button (in win 7 and 10)
FT8 Audio cable details
If your laptop doesn’t have 3.5mm mic and speaker ports you can use a USB (universal serial bus) Mic and Speaker Adaptor which are widely available to provide these 3.5mm ports.
For receive audio use the AF-Out Phono socket which is 600 ohm as your feed to the PC’s mic socket.
For transmit audio there are two choices both are 600 ohm and I found simply using a 600 ohm resister in series worked fine so no need for transformers:-
- the front panel Mic socket (with 600 ohm resistor in series)
- the rear panel Patch-In socket (with 600 ohm resistor in series).
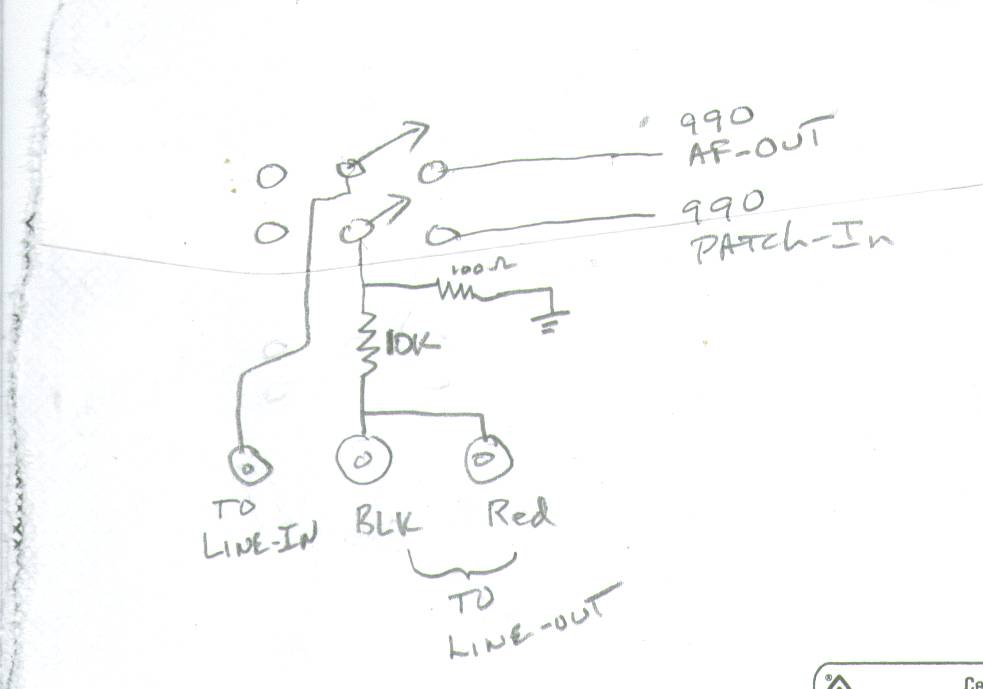
I used the Patch-In socket with a 600 ohm resistor in series at the PC end and then I broke the cable going to the Patch-In socket with a simple in-line phono plug and socket so that I could decouple the cable when I was having SSB QSOs otherwise it would mute the front panel Mic socket.
Ed Hajjar (K1MMI) uses a similar but different configuration below for his audio connections.
What are the differences between FT-990 ROM v1.2 and v1.3 CAT protocols
The differences between v1.2 and v1.3 CAT protocols are around the UPDATE command sent to the rig to requests its current settings which includes VFOs, modes and memory data.
In v1.2, the UPDATE command has no options, it always brings back 1492 bytes which at 4800 Baud takes 4 to 5 seconds which makes regular polling of the 990 to display its current settings unusable in any practical sense.
In v1.3, the UPDATE command has 5 options to bring back specific settings data; selecting just the VFOs, or a specific Memory channel etc and it has RIT frequency adjustments too. Its full Update is now 1508 bytes but that is never used by CAT programs as they only need to request the specific information they need of 16 or 32 bytes taking just a few milliseconds.
CAT/FT8 Software : WSJT-X
I started using WSJT-X v2.5.4 for FT8 (and other digimodes) which is available at https://physics.princeton.edu/pulsar/k1jt/wsjtx.html
The standard install should be fine for v1.3 ROM rigs.
As of WSJT-X version 2.6, I believe the standard software install now includes my changes to support v1.2 ROM rigs. The necessary compromise is that whilst you can control the rig from WSJT-X, the software will only read your rig’s settings once at start-up and not at all after this.
The rest of this section describes my workaround for before version 2.6 of WSJT-X…
For v1.2 ROM, I reprogrammed how WSJT-X ‘talks’ to the rig with the much appreciated collaboration of Ed Hajjar (K1MMI). Ed has put useful guidance within the FT-990 Group Files area at https://groups.io/g/ft990/files. There is also background to this work in the Forum at https://groups.io/g/ft990/message/533
WSJT-X uses Hamlib which is a software library that many digimodes software packages use. Hamlib contains rig specific CAT programs so that WSJT-X itself can remain generic. It is Hamlib’s code for the FT-990 that I reprogrammed and recompiled to locally to create a new Hamlib library file libhamlib-4.dll which can be simply copied into the standard installed WSJT-X/bin folder as below.
Please note: my version of the Hamlib DLL does not work with FT990 ROM v1.3, it only works for v1.2 (and other rigs). I have been working with Mike Black of the Hamlib development group and my version has been accepted into the Hamlib release development process. Hopefully the next official release of Hamlib and WSJT-X will incorporate support for v1.2 and v1.3 ROMs.

First rename your existing libhamlib-4.dll file (seen above) as libhamlib-4-old.dll or something (so you can restore your WSJT-X to how it was before if need be).
Then, at your own risk, download using this link libhamlib-4.dll (doing a right-click Save as)
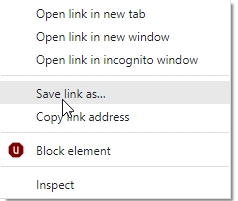
… into your existing version of WSJT-X/bin folder

You will probably see a message warning you about downloading such files and I suggest you virus check this file before using it.
Setting up WSJT-X for FT-990
These settings are the same for either ROM version with the exception of the Rig. For v1.2 you should select Yaesu FT-990 Old Rom rather than FT-990 (which v1.3 users should select).
Go into WSJT-X settings:-
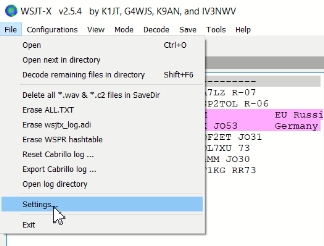
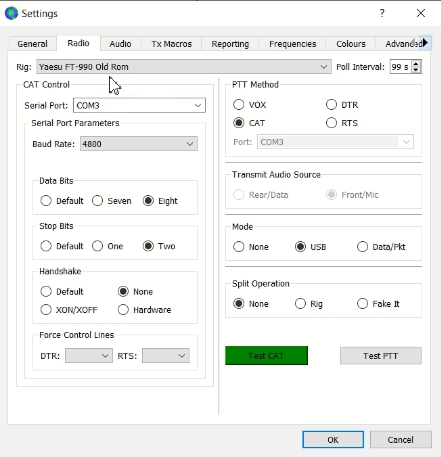
Select Rig = Yaesu FT-990 Old Rom
Set 99 (seconds) as the polling interval.
Enter your Serial port and the FT990 CAT requires:-
- speed of 4800 Baud
- 8 data bits
- no parity bit
- 2 stop bits
Please follow the screenshot below. You should also set PTT method to CAT
Setting Audio Levels
Getting the audio levels right took some time! There is information in the WSJT-X user manual but these are my tips:-
Audio output to the PC
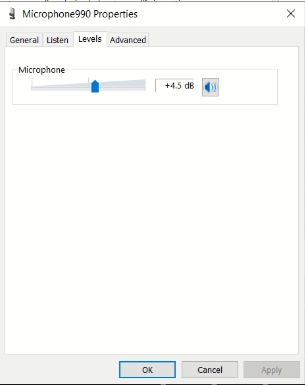
In the WSJT-X screen you should be seeing receive audio at around 40-60dB. Adjust your PC mic levels to achieve this.
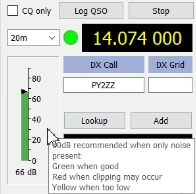
So similarly, in the Sounds app go to the Recording tab and see the audio level that’s arriving at the PC.
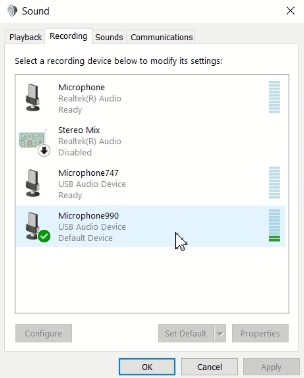
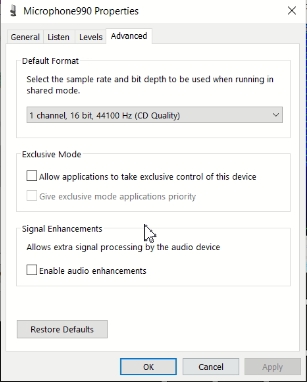
Select the mic device and click [Properties] to adjust the levels in the Levels tab and to untick all those checkboxes in the Advanced tab. I try to set this to 0dB but the most important factor is that WSJT-X receive strength (the green bar) is around the middle of the range.
RF Output and Audio input to the rig
FT8 is a weak signal mode and designed for low power use. In fact, as FT8 transmission is continuous modulation it is pretty taxing on your finals so I’d keep max power output under 30 watts. Generally, if a path is open and your antenna is fine 10 watts will do.
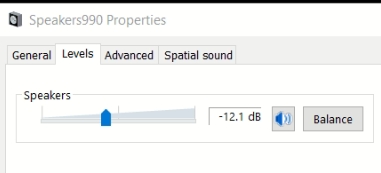
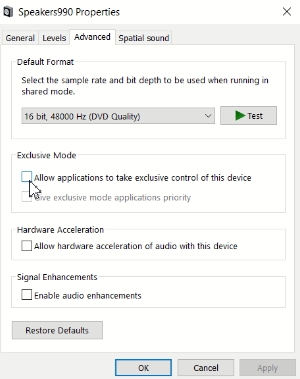
For the following checklist you will need to check/modify your soundcard settings: Right click on the speaker icon in the task bar > click on Sounds > select the Audio Device you are using (mine is USB) > click [Properties] > go to the Levels tab > adjust your levels and click [Apply]
This checklist works for me:-
- Set Soundcard Speaker level to 0dB – this is pretty loud but effectively I’m trying to put WJTX-X’s power slider in control.
- Turn off Speaker audio enhancements; make sure this speaker device isn’t your default audio or communications device; audio format should be high quality – 16bit, 48000Hz.
- Set WJTX-X Power level to -30dB
- Set 990 RF Drive to around 20w CW and check SWR is okay. I’m doing this to calibrate as you won’t want FT8 to exceed this level. Swap to SSB.
- Set 990 Mic Gain to zero and set meter to Power Output
- Click WSJT-X [Tune] and slowly advance 990 Mic Gain until it stops increasing power.
- You should be okay to send CQ now
- As you transmit: ALC should be zero or low in the blue section. If its higher than this ease off Mic Gain until it zero or low. You can try increasing RF Drive slightly if you need to.
My experience of using WSJT-X with CAT for FT-990 ROM v1.2
My reprogramming fetches the 990’s frequency and settings only once at program start up which takes around 5 seconds. The polling interval indicates how often the program will recheck the rig but this would impose further receive blackouts every interval which would be very inconvenient mid QSO. I have blocked all further updates after start up to get around this but I would still recommend using the maximum polling interval of 99 seconds.
If you retune the rig you should restart the program. However, the usual approach with WSJT-X and FT8 is to drive the rig from the program so this seems an easy loss to accept.
My first FT8 QSOs are below which were with Belarus and Puerto Rico on 25w using my special call-sign MQ0EZP for Queen Elizabeth II’s Platinum Jubilee. I’ve had a few QSOs across the pond now and had Japan respond to my CQ. The best approach with FT8 seems to be to choose a quiet spot for Tx, hold the Tx frequency and then click on an incoming CQ to move the Rx frequency to theirs:-

FT8 gives a great insight to real-time propagation. Using FT8 the bands always seem open to some degree which isn’t how it appears on SSB is it! I have to say however that FT8 feels like you’re always in contest mode with rubber stamp QSOs and doesn’t have the richness of contacts but once you have WSJT-X working you can try other digimodes of course.
WSJT-X is compatible with a few logging applications but I found LOG4OM logging software works well for me. It took a bit of setting up but it does have a comprehensive user guide. LOG4OM frequently polls the log file that WSJT-X outputs and will also upload that to eQSL, QRZ etc.
FAQs and Tips
- In WSJT-X, you’re in transmit (or pressing Tune) but there’s no power going out (assuming it worked before)
⇒ If you are using USB audio , have you plugged your USB audio device into a different USB port? If so you will have to go through the audio set up again for that port. - Not all CAT serial cables work. If your rig isn’t responding normally please see the CAT cable section above if your cable has a SiLabs cable.
- You can see the waterfall, see the audio input level is okay and hear/see digimodes but nothing/very little is being decoded.
⇒ You need to re-sync your date/time. A couple of seconds out of sync will mean you see nothing. - Working DX on FT8 is much the same as SSB. The DX station you’re trying to contact might be hearing other stations on the frequency (ie. audio offset) that you are using. Try shifting your Tx frequency up and down to a different channel and hopefully you might get better luck.
What about the WSJT-Z fork?
WSJT-Z is based on WSJT-X with some added features that some might find useful, such as the ability to filter the band activity window by continent, country, prefix. It has lots of nice to have extras and highlights 73 calls as though they were calling CQ which is a great feature.
I decided to try it out and not wanting to upset my installation of WSJT-X, I installed WSJT-Z to a different folder. I did have to fiddle with the desktop shortcuts but that was all.
I found:-
- I was able to overwrite the WSJT-Z libhamlib-4.dll in exactly the same way as I had done with WSJT-X.
- Both WSJT-X and WSJT-Z were happy to co-exist in their separate folders.
- WSJT-Z user application data is mapped to the same user folder as WSJT-X and so all the nice config, settings and importantly the log files were immediately picked up and used.
I didn’t try this but I wouldn’t advise trying to run both programs at the same time as I’m sure that would run into problems.
I like WSJT-Z, it certainly gives better visibility if your goal is to target particular countries or states or just want to work outside of your continent. For the time being I’ve switched to using WSJT-Z but I would recommend getting used to WSJT-X first before trying it.
Setting up LOG4OM – some tips
I found LOG4OM integrated well with WSJT-X and eQSL and is quite easy to use. I didn’t make notes when setting up so please refer to LOG4OM’s set up instructions. These screenshots are just some tips which might help…
1. Once installed, you will need to set up your user specific settings in Program Configuration.
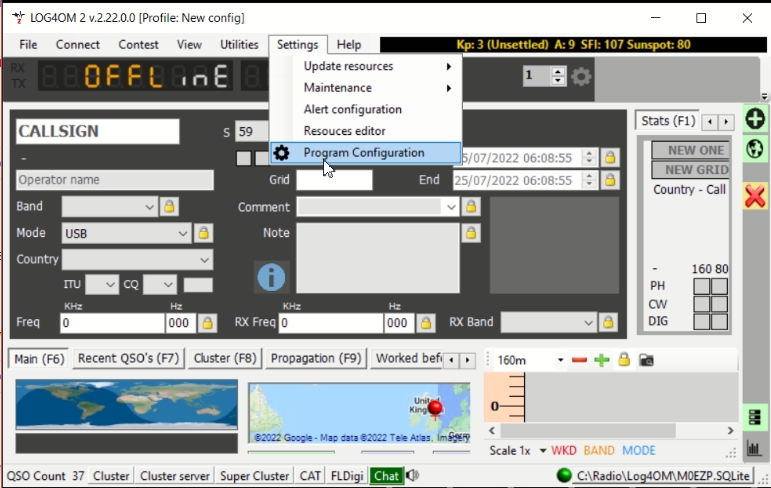
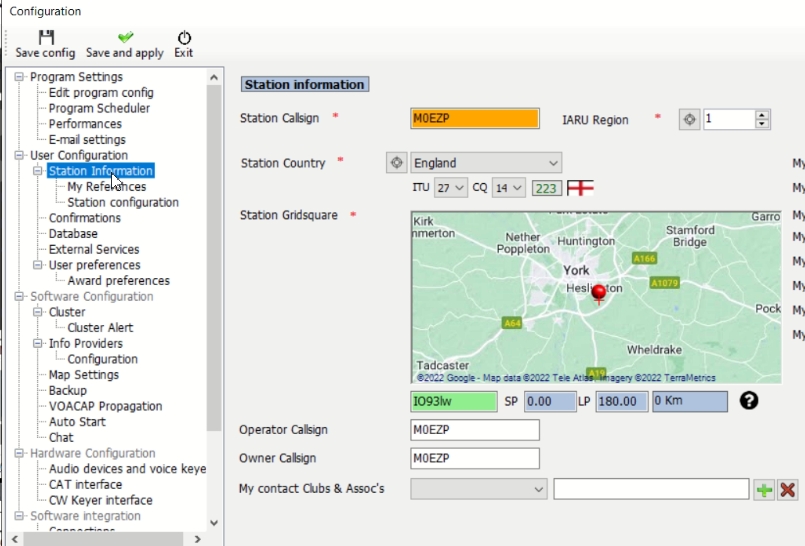
2. Station Identification is straight forward
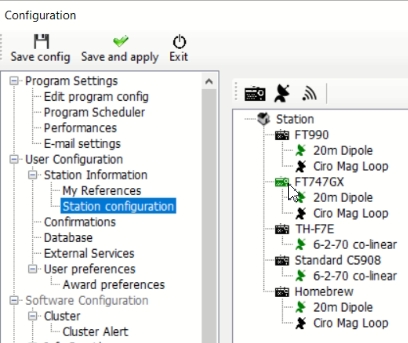
3. Setting up your rigs, antennas and their power settings is a bit quirky
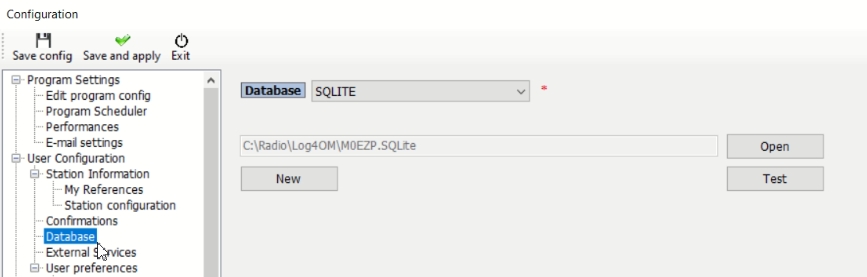
4. You need to create a local database – opt for SQLite for the least complicated option
5. I integrated LOG4OM with eQSL and as I don’t use QRZ or LOTW etc for logging these are just my eQSL settings. Make sure they match your eQSL or other QSL provider’s credentials exactly.
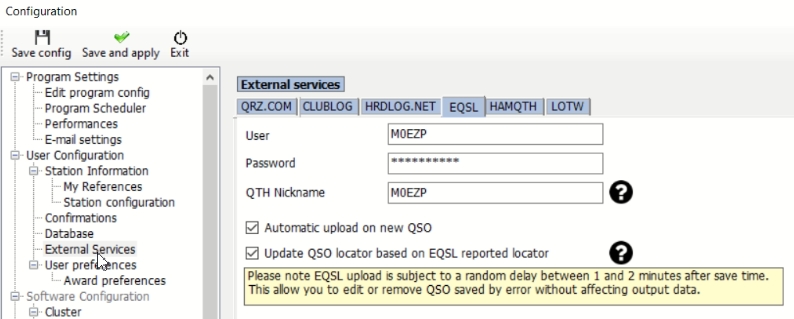
6. This section is where you set up LOG4OM’s monitor to watch for new QSOs in WSJT-X’s ADIF file

Next bit, tick the box…
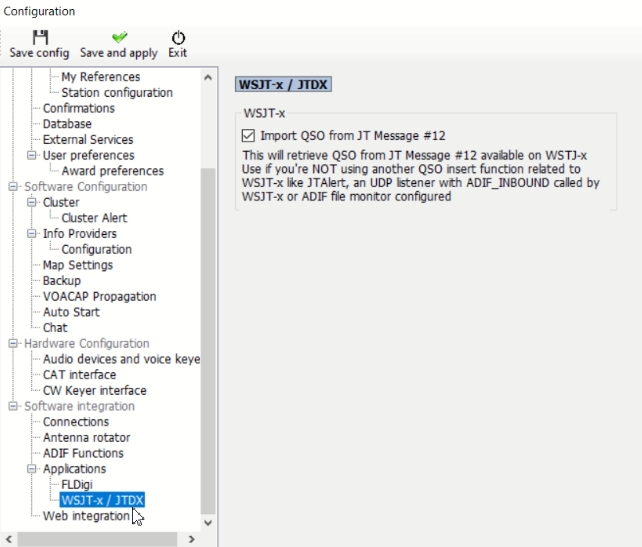
7. To populate the LOG4OM QSO information directly from the station you’ve just clicked on in WSJT-X you need two settings.
In LOG4OM:
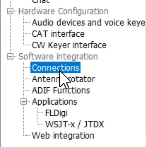
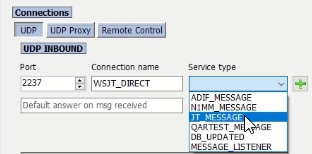
Add a UDP inbound connector for JT_MESSAGE like this (click on the + and then Apply and Save)
In WSJT-X: fill in the UDP section as below…
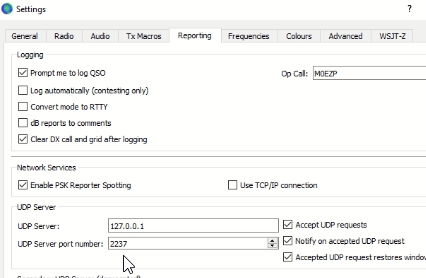
Now close and reopen both WSJT-X and LOG4OM
8. You don’t need to switch CAT on from LOG4OM as it uses the above direct connection from WSJT-X (JT-Message) to pick up your frequency, mode etc. If you want to use LOG4OM on its own without WSJT-X, it should work for ROM v1.3 using similar COM port, parity and bit settings as described above. Last time I checked, LOG4OM had bundled an older version of Hamlib than my fix and ROM v1.2 won’t work (until they update it).

9. The QSO Grid is useful to have open all the time
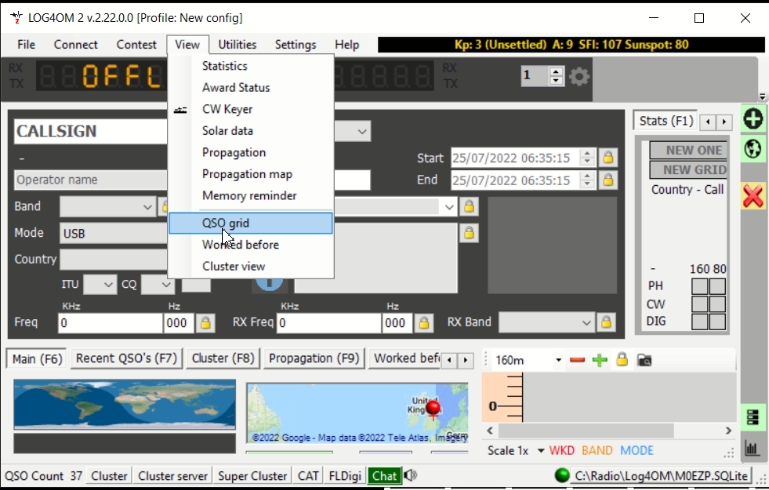
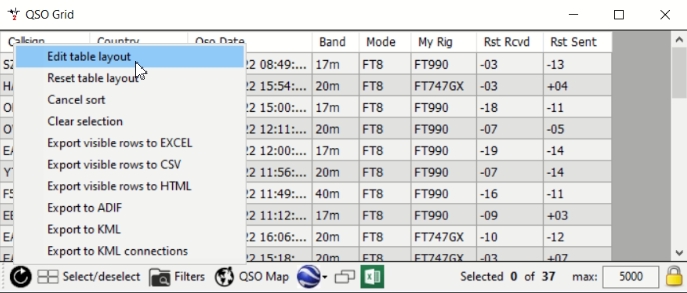
10. I modified my QSO Grid layout to show these columns but that is my personal preference
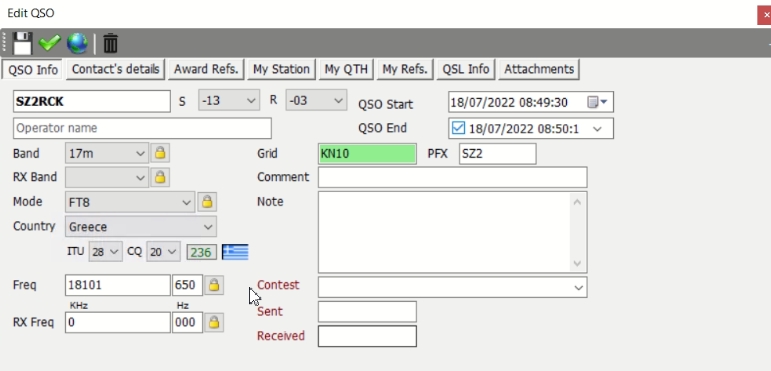
11. To Edit a QSO just double click on a log entry and see the tabs at the top of the window to pick different aspects
12. One problem that I found was that eQSL doesn’t use the COMMENTS field it only uses QSLMSG. There is a way around this for programmers who understand SQL Database commands. I used SQLite database and so I downloaded DB Browser for SQLite https://sqlitebrowser.org/ and executed the following SQL against the LOG table. This triggers an update to copy across the comment field into QSLMSG ready for update to eQSL (Thanks to VK2MET Alan McDonald for the idea)
CREATE TRIGGER [INSQSLMSG]
AFTER INSERT
ON [Log]
FOR EACH ROW
WHEN (NEW.QSLMSG='') AND (NEW.COMMENT<>'')
BEGIN
UPDATE LOG
SET QSLMSG=SUBSTR(COMMENT,0,300)
WHERE QSOID=NEW.QSOID;
END
Or as I modified it for my requirements because eQSL likes QSL comments in the QSLMSG field whereas QRZ is happy with the COMMENT field. I also wanted to send a 73 message in appreciation of the contact if I hadn’t entered a specific QSL message when WSJT-X puts up the Log window at the end of the contact.
CREATE TRIGGER [INSQSLMSG] AFTER INSERT ON [Log] FOR EACH ROW WHEN (NEW.QSLMSG=”) BEGIN UPDATE LOG SET QSLMSG=’Tnx for the QSO. 73 David’, comment=’Tnx for the QSO. 73 David’ WHERE QSOID=NEW.QSOID AND (NEW.COMMENT=”); UPDATE LOG SET QSLMSG=SUBSTR(COMMENT,0,300) WHERE QSOID=NEW.QSOID AND (NEW.COMMENT<>”); END
13. Special Events Calls from LOG4OM to eQSL
I needed to set up MR0EZP and this is how I set it up…
a) Set up the new call in eQSL and remember the nickname you’ve given it
b) In LOG4OM Settings > go to User Profiles and clone the one that works as a new profile for MR0EZP
c) In Station Info change the Station callsign to MR0EZP
d) In External Services go to the eQSL tab and change both the User and QTH nickname to the new call, MR0EZP (this was odd as eQSL needs the new call in the User!)
For Software developers: how to rebuild Hamlib to match future releases
My source code in C++ is also available to download ft990.c and ft990.h
I started with https://sourceforge.net/projects/hamlib-sdk/ there is a guide to using this at https://hamlib-sdk.sourceforge.io/ and I found I had to tick all the options.
Once the JTSDK64 toolkit has been built. You enter mingw64 at the powershell prompt to run the mingw64 environment which will recompile and link your software to produce a new Hamlib.
To recompile and link you enter at the mingw64 prompt: build-hamlib
It is only the Hamlib library file libhamlib-4.dll that you need to copy from the /bin folder below…
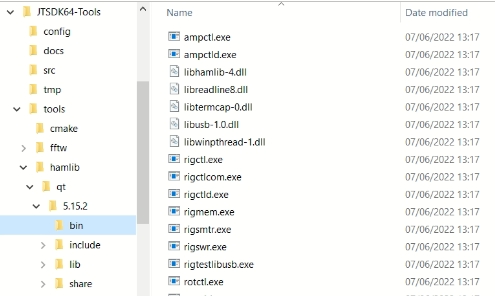
… into your existing version of WSJT-X/bin folder (my WSJT-X is version 2.5.4 but WSJT-X from recent years will probably work with a new Hamlib DLL).
Debugging
There are two options, debug within WSJT-X or debug through the command line interface Rigctl.
Within WSJT-X you can download wsjtx_log_config.ini and save it to C:\Users\[your-username]\AppData\Local\WSJT-X
Then start up WSJT-X, do what you want to do, close down WSJT-X and you will find WSJT-X_Rigcontrol.log file will be in the same location as the ini file.
The example below is from Rigctl but the WSJT-X rigcontrol log is very similar:-
C:\Radio\wsjtx\bin> rigctl -m 1048 -r COM3 -vvvvv
rigctl Hamlib 4.5~git Tue May 24 13:17:55 2022 +0000 SHA=7ce07c
Report bugs to <hamlib-developer@lists.sourceforge.net>
rig_check_rig_caps: p1=00007ffbe035c960, p2=00007ffbe0362ed8, rig_model=00007ffbe035c960, macro_name=00007ffbe0362ed8
yaesu: initrigs4_yaesu called
rig_init(533): 000002690c5b9e2c rs->comm_state==0?=0
rig_init: rig has VFO_A
rig_init: rig has VFO_B
ft990_init called
1:rig.c(782):rig_open entered
rig_open: cwd=C:\Radio\wsjtx\bin
rig_open: C:\Radio\wsjtx\bin/.hamlib_settings does not exist
serial_open: COM3
serial_setup: tcgetattr
serial_setup: cfsetispeed=4800,0x000c
serial_setup: cfsetospeed=4800,0x000c
serial_setup: data_bits=8
serial_setup: parity=0
serial_setup: Handshake=None
serial_setup: tcsetattr TCSANOW
read_string_generic called, rxmax=4095 direct=1
2:rig.c(7082):async_data_handler_start entered
async_data_handler_start: async data support disabled
2:rig.c(7087):async_data_handler_start returning(0)
rig.c(251):add_opened_rig returning2(0)
rig_open: 000002690c5b9e2c rs->comm_state==1?=1
ft990_open called
ft990_open: write_delay = 50 msec
ft990_open: post_write_delay = 5 msec
ft990_open: read pacing = 0
ft990_send_dynamic_cmd called
ft990_send_dynamic_cmd: passed ci = 0x1f
ft990_send_dynamic_cmd: passed p1 = 0x00, p2 = 0x00, p3 = 0x00, p4 = 0x00,
write_block(): TX 5 bytes, method=1
0000 00 00 00 00 0e …..
../../src/src/rig.c(1219) trace
2:rig.c(2706):rig_get_vfo entered
rig_get_vfo: cache check age=1000000ms
rig_get_vfo: cache miss age=1000000ms
../../src/src/rig.c(2744) trace
ft990_get_vfo called
ft990_get_update_data called
ft990_get_update_data: entry passed ci 0x34
ft990_get_update_data: entry passed ch 0x00
ft990_get_update_data: passed ci 0x34
ft990_send_static_cmd called
write_block(): TX 5 bytes, method=1
0000 00 00 00 00 fa …..
read_block_generic called, direct=1
read_block_generic(): RX 5 bytes, direct=1
0000 08 20 40 07 20 . @.
ft990_get_update_data: read 5 bytes
ft990_get_vfo: vfo status_1 = 0x00
ft990_get_vfo: vfo status_2 = 0x00
ft990_get_vfo: stat_vfo = 0x01
2:rig_get_vfo: elapsed=343ms
2:rig.c(2765):rig_get_vfo returning(0)
1:rig.c(1279):rig_open returning(0)
Opened rig model 1048, ‘FT-990 Old Rom’
Backend version: 20220607.0, Status: Stable
rigctl_parse: called, interactive=1
Rig command: f
rigctl_parse: input_line: f
rigctl_parse: vfo_opt=0
1:rigctl_parse.c(2049):rigctl_get_freq entered
rig_get_freq(1875) called vfo=currVFO
vfo_fixup:(from rig_get_freq:1882) vfo=currVFO, vfo_curr=VFOA, split=0
vfo_fixup: Leaving currVFO alone
../../src/src/rig.c(1884) vfo=currVFO, curr_vfo=VFOA
rig_get_freq: cache miss age=1000000ms, cached_vfo=VFOA, asked_vfo=VFOA
rig_get_freq(1966): vfo_opt=0, model=1048
ft990_get_freq_uni called
ft990_get_freq_uni: passed vfo = 0x01
ft990_get_update_data called
ft990_get_update_data: entry passed ci 0x22
ft990_get_update_data: entry passed ch 0x00
ft990_get_update_data: passed ci 0x22
ft990_send_static_cmd called
write_block(): TX 5 bytes, method=1
0000 00 00 00 00 10 …..
read_block_generic called, direct=1
read_block_generic(): RX 1492 bytes, direct=1
0000 48 20 40 00 14 1b 9e 50 00 00 00 01 00 00 00 80 H @….P……..
0010 00 00 00 ff 14 1b 9e 50 00 00 00 01 00 00 00 80 …….P……..
0020 00 00 00 ff 11 15 cc a4 00 00 00 01 00 00 00 00 …………….
0030 80 00 00 ff 11 15 79 a8 00 00 00 01 00 00 00 80 ……y………
0040 00 00 00 ff 14 1b ab fc 00 00 00 01 00 01 00 00 …………….
0050 00 00 00 ff 8b 0a ae 60 00 00 00 00 00 00 00 00 …….`……..
0060 00 00 00 00 8b 0a ae 60 00 00 00 00 00 00 00 00 …….`……..
0070 00 00 00 00 09 08 3c e3 02 00 00 01 00 00 00 00 ……<………
0080 00 00 00 ff 8b 0a ae 60 00 00 00 00 00 00 00 00 …….`……..
0090 00 00 00 00 8b 0a ae 60 00 00 00 00 00 00 00 00 …….`……..
00a0 00 00 00 00 8b 0a ae 60 00 00 00 00 00 00 00 00 …….`……..
00b0 00 00 00 00 8b 0a ae 60 00 00 00 00 00 00 00 00 …….`……..
00c0 00 00 00 00 8b 0a ae 60 00 00 00 00 00 00 00 00 …….`……..
00d0 00 00 00 00 8b 0a ae 60 00 00 00 00 00 00 00 00 …….`……..
00e0 00 00 00 00 19 26 0e 30 00 00 00 01 00 00 00 00 …..&.0……..
00f0 00 00 00 ff 8b 0a ae 60 00 00 00 00 00 00 00 00 …….`……..
0100 00 00 00 00 8b 0a ae 60 00 00 00 00 00 00 00 00 …….`……..
0110 00 00 00 00 16 20 6c c8 02 00 00 01 00 00 00 00 ….. l………
0120 00 00 00 ff 04 03 07 00 00 00 00 00 00 00 00 00 …………….
0130 00 00 00 ff 8b 0a ae 60 00 00 00 00 00 00 00 00 …….`……..
0140 00 00 00 00 8b 0a ae 60 00 00 00 00 00 00 00 00 …….`……..
0150 00 00 00 00 04 02 e7 5c 00 ff f8 00 00 00 00 00 …….\……..
0160 00 00 00 ff 8b 0a ae 60 00 00 00 00 00 00 00 00 …….`……..
0170 00 00 00 00 8b 0a ae 60 00 00 00 00 00 00 00 00 …….`……..
0180 00 00 00 00 8b 0a ae 60 00 00 00 00 00 00 00 00 …….`……..
0190 00 00 00 00 8b 0a ae 60 00 00 00 00 00 00 00 00 …….`……..
01a0 00 00 00 00 8b 0a ae 60 00 00 00 00 00 00 00 00 …….`……..
01b0 00 00 00 00 8b 0a ae 60 00 00 00 00 00 00 00 00 …….`……..
01c0 00 00 00 00 8b 0a ae 60 00 00 00 00 00 00 00 00 …….`……..
01d0 00 00 00 00 8b 0a ae 60 00 00 00 00 00 00 00 00 …….`……..
01e0 00 00 00 00 8b 0a ae 60 00 00 00 00 00 00 00 00 …….`……..
01f0 00 00 00 00 8b 0a ae 60 00 00 00 00 00 00 00 00 …….`……..
0200 00 00 00 00 8b 0a ae 60 00 00 00 00 00 00 00 00 …….`……..
0210 00 00 00 00 8b 0a ae 60 00 00 00 00 00 00 00 00 …….`……..
0220 00 00 00 00 8b 0a ae 60 00 00 00 00 00 00 00 00 …….`……..
0230 00 00 00 00 8b 0a ae 60 00 00 00 00 00 00 00 00 …….`……..
0240 00 00 00 00 8b 0a ae 60 00 00 00 00 00 00 00 00 …….`……..
0250 00 00 00 00 8b 0a ae 60 00 00 00 00 00 00 00 00 …….`……..
0260 00 00 00 00 8b 0a ae 60 00 00 00 00 00 00 00 00 …….`……..
0270 00 00 00 00 8b 0a ae 60 00 00 00 00 00 00 00 00 …….`……..
0280 00 00 00 00 8b 0a ae 60 00 00 00 00 00 00 00 00 …….`……..
0290 00 00 00 00 8b 0a ae 60 00 00 00 00 00 00 00 00 …….`……..
02a0 00 00 00 00 8b 0a ae 60 00 00 00 00 00 00 00 00 …….`……..
02b0 00 00 00 00 8b 0a ae 60 00 00 00 00 00 00 00 00 …….`……..
02c0 00 00 00 00 8b 0a ae 60 00 00 00 00 00 00 00 00 …….`……..
02d0 00 00 00 00 8b 0a ae 60 00 00 00 00 00 00 00 00 …….`……..
02e0 00 00 00 00 8b 0a ae 60 00 00 00 00 00 00 00 00 …….`……..
02f0 00 00 00 00 8b 0a ae 60 00 00 00 00 00 00 00 00 …….`……..
0300 00 00 00 00 8b 0a ae 60 00 00 00 00 00 00 00 00 …….`……..
0310 00 00 00 00 8b 0a ae 60 00 00 00 00 00 00 00 00 …….`……..
0320 00 00 00 00 8b 0a ae 60 00 00 00 00 00 00 00 00 …….`……..
0330 00 00 00 00 8b 0a ae 60 00 00 00 00 00 00 00 00 …….`……..
0340 00 00 00 00 8b 0a ae 60 00 00 00 00 00 00 00 00 …….`……..
0350 00 00 00 00 8b 0a ae 60 00 00 00 00 00 00 00 00 …….`……..
0360 00 00 00 00 8b 0a ae 60 00 00 00 00 00 00 00 00 …….`……..
0370 00 00 00 00 8b 0a ae 60 00 00 00 00 00 00 00 00 …….`……..
0380 00 00 00 00 8b 0a ae 60 00 00 00 00 00 00 00 00 …….`……..
0390 00 00 00 00 8b 0a ae 60 00 00 00 00 00 00 00 00 …….`……..
03a0 00 00 00 00 8b 0a ae 60 00 00 00 00 00 00 00 00 …….`……..
03b0 00 00 00 00 8b 0a ae 60 00 00 00 00 00 00 00 00 …….`……..
03c0 00 00 00 00 8b 0a ae 60 00 00 00 00 00 00 00 00 …….`……..
03d0 00 00 00 00 8b 0a ae 60 00 00 00 00 00 00 00 00 …….`……..
03e0 00 00 00 00 8b 0a ae 60 00 00 00 00 00 00 00 00 …….`……..
03f0 00 00 00 00 8b 0a ae 60 00 00 00 00 00 00 00 00 …….`……..
0400 00 00 00 00 8b 0a ae 60 00 00 00 00 00 00 00 00 …….`……..
0410 00 00 00 00 8b 0a ae 60 00 00 00 00 00 00 00 00 …….`……..
0420 00 00 00 00 8b 0a ae 60 00 00 00 00 00 00 00 00 …….`……..
0430 00 00 00 00 8b 0a ae 60 00 00 00 00 00 00 00 00 …….`……..
0440 00 00 00 00 8b 0a ae 60 00 00 00 00 00 00 00 00 …….`……..
0450 00 00 00 00 8b 0a ae 60 00 00 00 00 00 00 00 00 …….`……..
0460 00 00 00 00 8b 0a ae 60 00 00 00 00 00 00 00 00 …….`……..
0470 00 00 00 00 8b 0a ae 60 00 00 00 00 00 00 00 00 …….`……..
0480 00 00 00 00 8b 0a ae 60 00 00 00 00 00 00 00 00 …….`……..
0490 00 00 00 00 8b 0a ae 60 00 00 00 00 00 00 00 00 …….`……..
04a0 00 00 00 00 8b 0a ae 60 00 00 00 00 00 00 00 00 …….`……..
04b0 00 00 00 00 8b 0a ae 60 00 00 00 00 00 00 00 00 …….`……..
04c0 00 00 00 00 8b 0a ae 60 00 00 00 00 00 00 00 00 …….`……..
04d0 00 00 00 00 8b 0a ae 60 00 00 00 00 00 00 00 00 …….`……..
04e0 00 00 00 00 8b 0a ae 60 00 00 00 00 00 00 00 00 …….`……..
04f0 00 00 00 00 8b 0a ae 60 00 00 00 00 00 00 00 00 …….`……..
0500 00 00 00 00 8b 0a ae 60 00 00 00 00 00 00 00 00 …….`……..
0510 00 00 00 00 8b 0a ae 60 00 00 00 00 00 00 00 00 …….`……..
0520 00 00 00 00 8b 0a ae 60 00 00 00 00 00 00 00 00 …….`……..
0530 00 00 00 00 8b 0a ae 60 00 00 00 00 00 00 00 00 …….`……..
0540 00 00 00 00 8b 0a ae 60 00 00 00 00 00 00 00 00 …….`……..
0550 00 00 00 00 8b 0a ae 60 00 00 00 00 00 00 00 00 …….`……..
0560 00 00 00 00 8b 0a ae 60 00 00 00 00 00 00 00 00 …….`……..
0570 00 00 00 00 8b 0a ae 60 00 00 00 00 00 00 00 00 …….`……..
0580 00 00 00 00 8b 0a ae 60 00 00 00 00 00 00 00 00 …….`……..
0590 00 00 00 00 8b 0a ae 60 00 00 00 00 00 00 00 00 …….`……..
05a0 00 00 00 00 8b 0a ae 60 00 00 00 00 00 00 00 00 …….`……..
05b0 00 00 00 00 8b 0a ae 60 00 00 00 00 00 00 00 00 …….`……..
05c0 00 00 00 00 8b 0a ae 60 00 00 00 00 00 00 00 00 …….`……..
05d0 00 00 00 00 ….
ft990_get_freq_uni: p0=0x1b p1=0x9e p2=0x50
ft990_get_freq_uni: freq = 18100000 Hz for vfo 0x01
1:rig_get_freq: elapsed=3880ms
Frequency: 18100000
1:rigctl_parse.c(2075):rigctl_get_freq returning(0)
rigctl_parse: called, interactive=1
Rig command: q
1:rig.c(1301):rig_close entered
ft990_close called
2:rig.c(7124):async_data_handler_stop entered
2:rig.c(7154):async_data_handler_stop returning(0)
ser_close: restoring options
rig_close(1433): 000002690c5b9e2c rs->comm_state==0?=0
1:rig.c(1437):rig_close returning(0)
ft990_cleanup called
For info. The list of Rigctl rig commands are output by entering ? at the prompt:-
Commands (some may not be available for this rig):
F: set_freq (Frequency) f: get_freq ()
M: set_mode (Mode,Passband) m: get_mode ()
I: set_split_freq (TX Frequency) i: get_split_freq ()
X: set_split_mode (TX Mode,TX Passband) x: get_split_mode ()
K: set_split_freq_mode(TX Frequency,TX Mode,TX Passband) k: get_split_freq_mode()
S: set_split_vfo (Split,TX VFO) s: get_split_vfo ()
N: set_ts (Tuning Step) n: get_ts ()
L: set_level (Level,Level Value) l: get_level (Level)
U: set_func (Func,Func Status) u: get_func (Func)
P: set_parm (Parm,Parm Value) p: get_parm (Parm)
G: vfo_op (Mem/VFO Op) g: scan (Scan Fct,Scan Channel)
A: set_trn (Transceive) a: get_trn ()
R: set_rptr_shift (Rptr Shift) r: get_rptr_shift ()
O: set_rptr_offs (Rptr Offset) o: get_rptr_offs ()
C: set_ctcss_tone (CTCSS Tone) c: get_ctcss_tone ()
D: set_dcs_code (DCS Code) d: get_dcs_code ()
?: set_ctcss_sql (CTCSS Sql) ?: get_ctcss_sql ()
?: set_dcs_sql (DCS Sql) ?: get_dcs_sql ()
V: set_vfo (VFO) v: get_vfo ()
T: set_ptt (PTT) t: get_ptt ()
E: set_mem (Memory#) e: get_mem ()
H: set_channel (Channel) h: get_channel (Channel,Read Only)
B: set_bank (Bank) _: get_info ()
J: set_rit (RIT) j: get_rit ()
Z: set_xit (XIT) z: get_xit ()
Y: set_ant (Antenna,Option) y: get_ant (AntCurr)
?: set_powerstat (Power Status) ?: get_powerstat ()
?: send_dtmf (Digits) ?: recv_dtmf ()
*: reset (Reset) w: send_cmd (Cmd)
W: send_cmd_rx (Cmd,Reply) b: send_morse (Morse)
?: stop_morse () ?: wait_morse ()
?: send_voice_mem (Voice Mem#) ?: get_dcd ()
?: set_twiddle (Timeout (secs)) ?: get_twiddle ()
?: uplink (1=Sub, 2=Main) ?: set_cache (Timeout (msecs))
?: get_cache () 2: power2mW (Power [0.0..1.0],Frequency,Mode)
4: mW2power (Pwr mW,Freq,Mode) 1: dump_caps ()
3: dump_conf () ?: dump_state ()
?: chk_vfo () ?: set_vfo_opt (Status)
?: get_vfo_info (VFO) ?: get_rig_info ()
?: get_vfo_list () ?: get_modes ()
?: get_clock () ?: set_clock (YYYYMMDDHHMMSS.sss+ZZ)
?: halt () ?: pause (Seconds)
?: password (Password) ?: get_mode_bandwidths(Mode)
?: set_separator (Separator) ?: get_separator ()
In interactive mode prefix long command names with ‘\’, e.g. ‘\dump_state’
The special command ‘-‘ is used to read further commands from standard input
Commands and arguments read from standard input must be white space separated,
comments are allowed, comments start with the # character and continue to the
end of the line.